


Last Updated: October 23, 2026
Quick Summary
To replace kitchen faucet aerator, grip it with your fingers or a rubber band-wrapped wrench and turn counterclockwise until it comes free. If stuck, soak it in white vinegar for 30 minutes to 2 hours to dissolve mineral buildup, then try again with steady, patient pressure. Install the new aerator by hand-threading it first, then snugging it with a wrench without over-tightening.
- Most kitchen faucet aerators measure between 15mm and 24mm in diameter.
- Male aerators have visible external threads, while female aerators have internal threads and cache aerators have no visible threads.
- Standard aerators flow at 2.2 gallons per minute, while low-flow models use 1.5 gallons per minute or less.
- Never use excessive force on a stuck aerator, as stripped threads require replacing the entire faucet spout.
- Always flush the water line for one minute with the aerator removed before reinstalling to clear debris.
Table of Contents
- What You'll Need Before Starting
- How to Identify Your Faucet Aerator Type
- How to Remove a Recessed Faucet Aerator
- How to Fix a Stuck Faucet Aerator
- Using a Faucet Aerator Removal Tool
- Removing the Aerator by Hand
- Choosing and Installing a Replacement Aerator
- Common Mistakes to Avoid
- Frequently Asked Questions
What You'll Need Before Starting
To replace kitchen faucet aerator is straightforward when you have the right tools on hand. Before you begin, gather these essentials to make the job quick and hassle-free.
You'll need an adjustable wrench or pliers to grip the aerator if it's stuck. Keep a rubber band nearby to protect your faucet finish from wrench marks. Have a small container ready to catch water that may drip during removal. A cloth or old towel helps with cleanup.
Most importantly, you'll want a replacement aerator that matches your current one. Grab a flashlight to see inside the faucet spout clearly. If you're unsure about thread types, bring your old aerator to the store for comparison. A measuring tape helps confirm dimensions if needed.
How to Identify Your Faucet Aerator Type
Understanding your aerator type is the first step to successful replacement. Aerators come in three main styles, and identifying yours ensures you buy the right replacement.
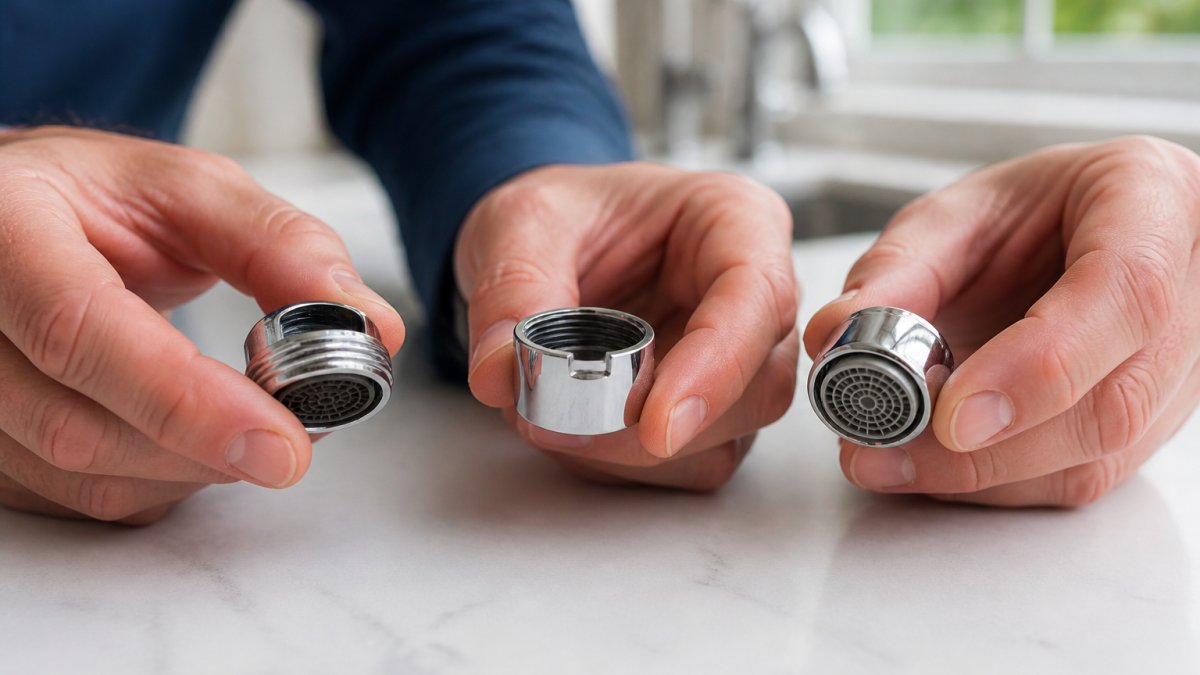
Male vs. Female vs. Cache Aerators
A male aerator has threads on the outside that screw directly into the faucet spout. These are the most common type in kitchens. You'll see the threads clearly when you look at the aerator from the side.
A female aerator has internal threads that receive a threaded insert. This type screws onto a threaded piece that's already inside your faucet spout. Female aerators are less common but still widely used in modern faucets.
A cache aerator sits inside the faucet spout without visible threads. It's held in place by a small collar or friction fit. These are trickier to remove because they don't screw out like the other types.
To identify which you have, look at your faucet spout. Can you see threads on the outside of the aerator? That's a male aerator.
How to Measure a Faucet Aerator
Measuring ensures your replacement aerator fits perfectly. Start by removing the aerator so you can measure it accurately. Most kitchen faucet aerators measure between 15mm and 24mm in diameter.
Use a measuring tape to check the width across the widest part of the aerator body. Write down this measurement. Next, count the threads or measure the threaded section length. This helps match the thread type and size when shopping.
Look at the aerator opening from the top. Note whether it has a single opening or multiple small holes. Some aerators have removable screens or inserts that affect water flow. These details matter when selecting a replacement.
Kitchen faucet aerators come in three main types, each with different characteristics and removal methods.
| Aerator Type | Thread Location | Appearance | Removal Difficulty |
|---|---|---|---|
| Male | Outside | Visible external threads | Easier |
| Female | Inside | Threads hidden in spout | Moderate |
| Cache | None | No visible threads | Trickier |
How to Remove a Recessed Faucet Aerator
Recessed aerators sit deeper inside the faucet spout, making them trickier to remove by hand alone. These require a specific approach to avoid damaging your faucet finish.
Start by trying to grip the aerator with your fingers. Turn counterclockwise gently. If it won't budge, stop and reach for a tool. Forcing it by hand risks stripping the threads or hurting your fingers.
Wrap a rubber band around the aerator to improve your grip. This protects the finish from tool marks. Grip firmly and turn counterclockwise. Many recessed aerators loosen with steady, patient pressure rather than sudden force.
If the rubber band method doesn't work, use an adjustable wrench or pliers. Wrap the rubber band around the aerator first, then grip it with the tool. Turn slowly counterclockwise. Listen for the click that signals the threads are releasing.
How to Fix a Stuck Faucet Aerator
A stuck aerator often means mineral buildup or corrosion has seized the threads. Don't panic, several proven methods can free it without damage.
The vinegar soak works well for mineral deposits. Fill a small cup with white vinegar and submerge the aerator for 30 minutes to 2 hours.
For aerators stuck in the spout, try this approach: wrap a rubber band around the aerator, then use an adjustable wrench with gentle, steady pressure. Turn slowly counterclockwise.
Heat can help loosen corrosion. Run hot water through the faucet for 30 seconds to warm the aerator and spout. The metal expands slightly, which sometimes breaks the corrosion bond.
If the aerator still won't budge after soaking and heating, use a faucet aerator removal tool. This specialized tool provides better use than standard wrenches.
Using a Faucet Aerator Removal Tool
A faucet aerator removal tool is purpose-built to handle stuck or recessed aerators. These tools cost very little and save frustration on difficult removals.
The tool has a notched head that fits into grooves on the aerator. This distributes pressure evenly and prevents the slipping that happens with regular wrenches. Insert the tool into the aerator grooves and turn counterclockwise.
Most removal tools work on both male and female aerators. They're especially helpful for cache aerators that have no visible threads to grip. The notched design catches the hidden collar or rim that holds the aerator in place.
To use the tool effectively, insert it firmly into the aerator grooves. Apply steady counterclockwise pressure. The notches should grip without slipping.
Removing the Aerator by Hand
Hand removal works best for aerators that aren't stuck or corroded. This method takes just seconds when conditions are right.
Grip the aerator with your fingers at the base where it meets the spout. Turn counterclockwise slowly and steadily. Most hand-removable aerators come free with gentle, patient turning. Don't rush or force it.
If your fingers slip, wrap a rubber band around the aerator to improve grip. The rubber provides friction without marking the finish. Grip firmly and turn counterclockwise again.
For better use, use your thumb and two fingers. Position your thumb on one side and two fingers on the opposite side. Apply even pressure as you turn counterclockwise.
Once the aerator starts turning, continue rotating until it comes free completely. Water may drip from the spout, that's normal. Have your cloth ready to catch it.
Choosing and Installing a Replacement Aerator
Selecting the right aerator to replace kitchen faucet aerator matters more than most people realize. An incompatible aerator won't fit properly and could leak or restrict water flow incorrectly.
Bring your old aerator to the store or take clear photos. Match the new aerator to your old one by size, thread type, and style. Most stores stock common sizes, but specialty aerators may require online ordering.
Consider water flow rate when choosing a replacement. Standard aerators flow at 2.2 gallons per minute (the EPA). Low-flow aerators use 1.5 gallons per minute or less (the EPA).
Check the aerator material. Brass aerators last longer than plastic and resist corrosion better. Stainless steel options work well if your faucet is stainless steel. Plastic aerators cost less but may need replacement sooner.
Checking Thread Type and Size
Before buying a replacement aerator, verify your thread type and size. This prevents buying an incompatible aerator that won't fit.
Measure your old aerator diameter. Most kitchen faucets use 15mm, 16mm, or 24mm aerators. Write down the exact size. Check whether the threads are on the outside (male) or inside (female).
Hold your old aerator up to the light. Male aerators show obvious external threads. Female aerators have threads visible only when you look inside the threaded section. Cache aerators have no visible threads at all.
Count the thread grooves if you're unsure. Male aerators typically have 12-16 grooves. This helps match to a replacement when shopping. Take a photo of your old aerator next to a ruler for reference.
Inspecting and Replacing the Washer or Gasket
The washer or gasket inside the aerator prevents leaks around the threads. Over time, these rubber or silicone pieces wear out and need replacement.
Remove your old aerator and look inside the threaded section. You'll see a small rubber washer or gasket.
If the washer looks cracked, flattened, or hardened, replace it. Most replacement aerators include a new washer.
To install the new aerator, align the threads carefully. Screw it in by hand first to avoid cross-threading.
After installation, run water through the faucet for about one minute with the aerator removed. This flushes out any debris from the water lines.
Common Mistakes to Avoid
Even simple aerator replacement trips up people when they skip key steps. Learning these mistakes now saves you time and frustration.
The biggest mistake is forcing a stuck aerator. Applying too much pressure strips the threads inside the faucet spout.
Another common error is buying the wrong size or thread type. Many people grab an aerator without checking compatibility.
Forgetting to check the washer is another frequent mistake. A worn washer causes leaks even with a new aerator installed.
Over-tightening the new aerator damages the washer and can crack the spout. Hand-tighten first, then snug it with a wrench. Stop when you feel resistance.
Some people skip flushing the water line after removal. Debris from inside the faucet can clog the new aerator.
If your faucet still has low water flow or splashing after aerator replacement, check how to fix splashing kitchen faucet or explore how to stop kitchen faucet splashing for other solutions.
Replacing your kitchen faucet aerator is one of the easiest home maintenance tasks you can tackle.
Frequently Asked Questions
What's the best tool for removing a stuck faucet aerator?
An adjustable wrench or pliers works well for most stuck aerators. Wrap a rubber band around the aerator first to protect the faucet finish, then grip gently and turn counterclockwise. For recessed aerators, a specialized faucet aerator removal tool gives you better leverage without damaging the spout. If the aerator is heavily corroded, apply a penetrating oil and wait 15 minutes before trying again.
How do you measure a faucet aerator to find the right replacement?
Remove the current aerator and measure the thread diameter using a ruler or calipers. Check the thread type by looking at whether the threads face inward (female) or outward (male). Write down both measurements, then match them when ordering your replacement.
Should I clean or replace a clogged faucet aerator?
Start by cleaning. Remove the aerator, soak the screen and parts in white vinegar for 30 minutes to dissolve mineral deposits, then rinse and reinstall. This restores water flow in most cases. Replace the aerator only if cleaning doesn't improve flow, if the screen is damaged, or if the gasket is cracked or deteriorated. Cleaning is faster and cheaper, so try it first.
Can I remove a kitchen faucet aerator without any tools?
Yes, many aerators unscrew by hand. Grip the aerator firmly and turn counterclockwise. If your hands slip, wrap a rubber band around it for better grip, or use a cloth for traction. Pull-down and pull-out faucets often have hand-accessible aerators. If the aerator is recessed into the spout or too tight to turn by hand, you'll need an adjustable wrench, pliers, or a faucet aerator removal tool.


