


Last Updated: November 8, 2026
Quick Summary
Preventing cable fraying at the ends means spreading bending stress away from the rigid plug, so pull the plug instead of the cord and leave an inch or two of slack near the connector. Reinforce the stress point with a pen spring, electrical tape, flexible putty, or heat-shrink tubing, and replace any cable with exposed wire.
- The connector end fails first because that is where all the bending happens.
- Wrap reinforcement behind the plug body so the plug still seats fully in the port.
- Stop using a cable the moment you see exposed wire, unusual warmth, or flickering charging.
- Coil cords in wide loops and secure them with soft Velcro ties rather than zip ties.
- Wireless charging reduces plug-ins and tugs on the cable end.
Table of Contents
- Why Charging Cables Fray at the Connector End
- How to Keep Charger Cord from Bending Too Sharply
- Charger Cord Protector DIY Methods That Actually Hold
- Comparing DIY and Store-Bought Cable Protectors
- How to Fix Fraying Charging Cords Safely
- How to Keep Charging Cords Tidy Without Damaging Them
- When to Stop Using a Frayed Cable
- Choosing a Charging Setup That Lasts
- Frequently Asked Questions
Why Charging Cables Fray at the Connector End
Cable fraying is the wear and tear that happens when the outer insulation of a charging cord splits, cracks, or peels back near the plug. The connector end is the weakest spot on any cable, and it fails first for one simple reason: that's where all the bending happens.
Every time you unplug your phone, you probably pull the cord itself instead of the plug. That small tug puts pressure on one tiny area. Do it hundreds of times and the outer sheath gives out.
Here's what's happening inside that spot:
- The connector is rigid metal. The cable is soft and flexible. Where they meet, stress builds fast.
- That junction is the strain relief point, and most cords have almost none.
- Repeated bending at the same angle weakens the cable sheath until it splits.
- Once the outer insulation cracks, the cable wire inside is exposed.
The BBC reported in BBC Future's coverage of charging cable damage that bad handling habits, not cheap materials alone, drive most cord failures. The fix is mostly about how you treat that connector end.
A cable that dies in months usually wasn't defective. It was bent to death.
How to Keep Charger Cord from Bending Too Sharply
The single best way to prevent sharp bending is to give the cord a gentle, permanent curve at the plug. A soft loop spreads stress over a longer stretch of cable instead of one tight point.
Try these habits:
- Pull the plug, not the cord. Grip the hard connector body when you unplug.
- Leave a slack loop. Keep an inch or two of loose cable near the plug so it never bends at a hard angle.
- Avoid the wrap-around grip. Wrapping the cord tightly around your hand or the charger trains a sharp crease into the cable.
- Route cords around edges. Don't let a cable hang over a desk or nightstand lip where it bends hard.
- Lift, don't yank. When you grab your phone, unplug first, then move.
A common mistake is coiling a cord tight around the power brick. That single habit creates the exact bend point that cracks first.
Charger Cord Protector DIY Methods That Actually Hold
The best DIY charger cord protector is one that adds flexible support right at the connector base, and a few household methods work well. Here's how to reinforce a cable end so it bends softly instead of sharply.
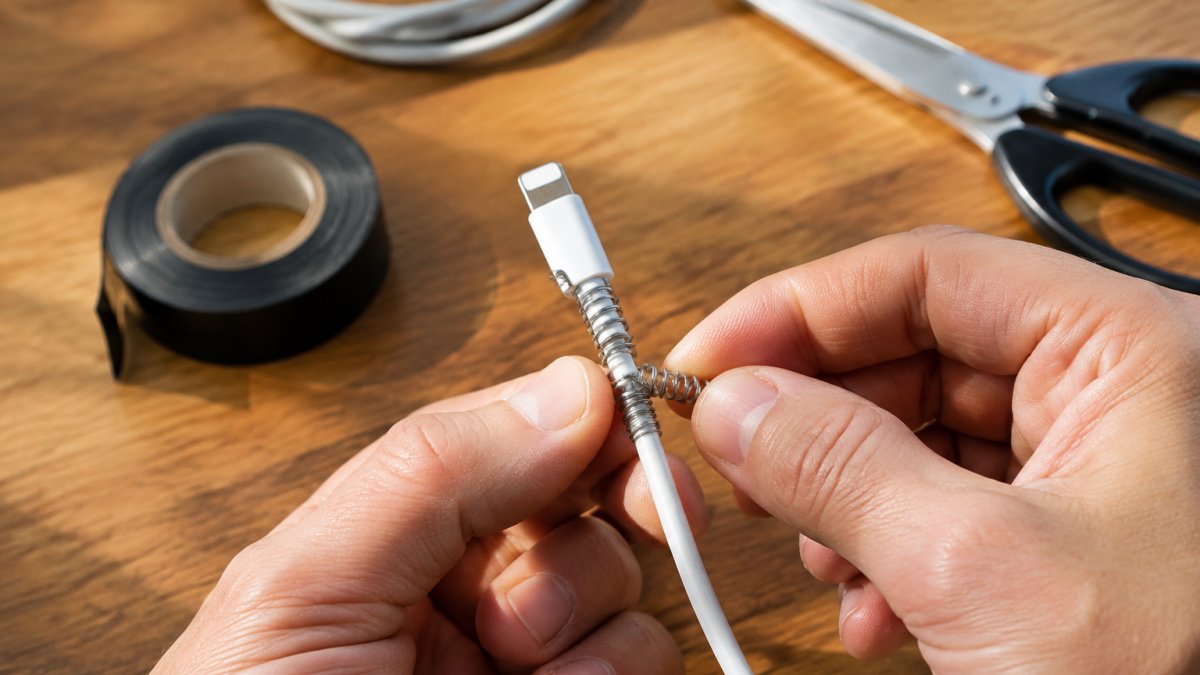
The pen spring method. Pull the spring out of a retractable ballpoint pen. Slide it over the cable end so one end sits against the hard connector body and the coil runs back along the jacket. The coil spreads bending force across its length.
Electrical tape wrap. Start at the connector body and wrap a few tight, overlapping layers back along the cable, building a small flexible collar that tapers down to the jacket. Keep it snug but not rigid.
Silicone or flexible putty. Moldable repair putty cures into a rubbery sleeve that holds the bend point steady. Press it around the base and let it set. It grips well but can look bulky.
Heat-shrink tubing. A short piece of heat-shrink over the junction gives a clean, snug collar once warmed. Slide it on before you need it, since it will not fit over an assembled plug. It's the tidiest DIY option if you have some on hand.
A common mistake is wrapping the whole cable instead of just the stress point. That adds bulk and stiffness without improving the bend, and it can trap heat.
Connector-specific fit. The shape of the plug body changes what works. USB-C and Lightning plugs have small, rounded bodies, so a spring or tape collar can sit close to the tip and obstruct the port if it creeps forward.
Comparing DIY and Store-Bought Cable Protectors
Store-bought silicone cable protectors are the easiest option, but DIY methods win on cost and fit. Here's how the main choices stack up.
| Method | Durability | Fit | Best For |
|---|---|---|---|
| Pen spring | Medium | Snug on most cords | Quick fix on a standard cable |
| Electrical tape | Low to medium | Adjustable | Covering a small split |
| Flexible putty | High | Custom molded | One cable you use daily |
| Heat-shrink tubing | High | Needs right size | A clean, permanent collar |
| Silicone protectors | High | Sized to connector type | No-fuss protection |
Store-bought silicone wrap protectors are another option. The catch is fit: a protector made for one connector type may sit loose on another. DIY methods let you mold the support to your exact cable end.
If you're building a durable setup for travel, our guide to durable USB-C cables for travel covers what actually survives repeated bending and packing.
How to Fix Fraying Charging Cords Safely
You can safely fix a fraying cord only when the damage is limited to the outer sheath and no wire is exposed. If you can see bare wire, stop and replace the cable. The most important distinction in this whole guide is between reinforcement and repair: adding tape, a spring, or putty to an intact cable is prevention, but wrapping a cable with exposed conductors is not a repair, it is a hazard you have hidden.
Prevention on an intact cable. If the sheath is whole and you are reinforcing the stress point before it fails, follow the DIY methods above. Unplug the cable first, keep the wrap behind the plug body, and check that the plug still seats fully in the port. Reinforcement should feel like a gentle taper, not a rigid cast.
Repair on a split sheath with no exposed wire. For minor sheath damage where the insulation is split but no copper is visible:
- Unplug everything first. Never work on a live cable.
- Check for exposed wire. If any copper is visible, the cable is done. Replace it.
- Clean the area. Wipe away dust and oil so tape or putty grips.
- Wrap or mold. Apply electrical tape or flexible putty over the split, extending past both ends of the damage.
- Test gently. Plug in and check for warmth or flickering. If either appears, replace the cord.
A temporary fix is fine for a cable you'll replace soon. It is not a permanent repair, and it does not restore the conductor or the strain relief inside the plug.
When to stop using a cable. Stop the moment you see exposed wire, feel unusual warmth at the plug, notice sparking or a burning smell, or find that the device charges only at certain angles. Those signs mean the damage has reached the conductors or the connector, and continuing to use it risks a short, a spark, or damage to the device.
Why reinforcement is not repair. Tape and putty cover the outside. They do not reconnect a broken conductor, restore a crushed strain relief, or stop heat from building at a failing joint. If the cable already flickers or heats, the failure is internal and the only safe fix is replacement. Use the reinforcement methods in this guide before damage starts, not after the conductors are compromised.
How to Keep Charging Cords Tidy Without Damaging Them
Tidy cords last longer because they aren't crushed, kinked, or yanked. The goal is loose, gentle storage, not tight bundles.
Try these:
- Loose loops, not tight coils. Coil cords in wide loops and secure with a soft tie.
- Velcro ties over zip ties. Zip ties pinch the sheath.
- One cord per hook or clip. Don't bunch several cords against one hard edge.
- Keep cords off the floor. Feet and chair wheels crush cable ends.
- Store at room temperature. Heat softens insulation over time.
For a full setup, our nightstand cable organization guide walks through tidying cords without stressing the ends.
When to Stop Using a Frayed Cable
Stop using a frayed cable the moment you see exposed wire, feel unusual warmth, or notice flickering charging. Those are signs the cable damage has reached the conductors, and continuing to use it risks a short or a spark.
Do a quick safety check:
- Is any copper wire visible?
- Does the plug feel hot after charging?
- Does the phone charge only at certain angles?
- Is the sheath split all the way through?
One "yes" means replace it. A taped-over cable with exposed wire is not safe, no matter how neat the wrap looks. If you're weighing whether a cheap replacement is worth the risk, read our breakdown on whether cheap charging cables are safe.
Choosing a Charging Setup That Lasts
The most durable charging setup reduces bending at the connector in the first place, and wireless charging does exactly that. Fewer plug-ins means fewer tugs on the cable end.
Start with prevention habits, then pick hardware that fits your space. A foldable charging station keeps cords off the floor and out of the way, which cuts the bending and crushing that wear cables out. Our foldable 3-in-1 charging station is built for exactly this: one spot for your devices, less wear on every cord.

For broader buying advice, our guide on choosing durable tech accessories that last covers materials and construction to look for.
Here's the short version of everything above:
| Problem | Fix | Why It Helps |
|---|---|---|
| Sharp bending at plug | Slack loop + pull the plug | Spreads stress off one point |
| Split sheath | Tape, putty, or heat-shrink | Covers damage, adds support |
| Tangled storage | Loose loops + velcro ties | Prevents kinks and crushing |
| Exposed wire | Replace the cable | Removes the safety risk |
| Constant plugging | Wireless charging station | Fewer tugs on the cord |
Cable fraying is a small problem with a simple answer: protect the bend point and stop yanking the cord. If you want to cut the wear entirely, Jackie's Attic carries charging stations that keep cords tidy and reduce daily plugging. Our foldable 3-in-1 station charges multiple devices from one spot, folds flat for travel, and keeps your cables off the floor where they get crushed. Get started with Jackie's Attic and give your charging cords a longer life.
Frequently Asked Questions
Why do charging cables fray near the connector?
The connector end takes the most stress. Every time you pull the cable out by the cord, stuff it into a bag, or bend it against a nightstand, the outer insulation flexes at the same spot. Over months, that repeated bending cracks the sheath and exposes the wire. A strain relief boot helps, but the biggest fix is grabbing the plug instead of the cord when unplugging.
Do cable protectors actually work for cable fraying?
They help, but only when they fit snugly against the connector. A loose silicone wrap or a spring that slides around does little because the cable still bends underneath it. Pair a protector with better handling habits, and you will get noticeably longer life out of each cord.
How do you fix a charger cable that is already fraying?
If the outer sheath is split but no copper is visible, you can wrap the damaged section with electrical tape or moldable putty as a temporary fix. If you can see exposed wire, stop using the cable. Tape will not restore the insulation, and a damaged cable can overheat or fail mid-charge. Replace it and add a protector to the new one before the same spot wears through.
How can I keep charging cords tidy without damaging them?
Loosely coil the cable in a circle about the size of your palm, then secure it with a velcro strap. Avoid wrapping it tightly around your hand or folding it at sharp angles, since both put pressure on the connector ends. Keep one cable per pouch or drawer slot, and never stuff a coiled cable under a laptop or between couch cushions where it gets pinched.


