


Table of Contents
- What You'll Need Before You Organize Cables on Your Desk
- Best Cable Management Tools for Any Desk Setup
- Step-by-Step: How to Organize Cables on Your Desk
- How to Hide Power Strips for a Cleaner Desk
- Cable Management for Standing Desks
- Cable Management for Rental or Non-Permanent Desks
- Cable Safety: Fire Prevention and Common Mistakes to Avoid
- Conclusion
Last Updated: August 22, 2026
What You'll Need Before You Organize Cables on Your Desk
Cable clutter is one of the most common complaints from people who otherwise have a great workspace setup. Prep work determines whether your setup stays clean for months or collapses into a tangle within a week.
Gather these materials:
- Cable ties or zip ties - reusable velcro versions are better than single-use plastic if you need to reroute
- Adhesive cable clips - for routing cables along desk edges and legs
- Cable sleeves - fabric or split-loom style to bundle multiple cables
- A cable tray or under-desk mount - to hold power strips and excess slack out of sight
- Cable labels or colored tape - for identification
- A power strip with surge protection - ideally with a flat plug
- Measuring tape - to check cable lengths before routing
Do a quick cable length audit before buying anything. Cables that are too long create clutter; cables too short force awkward routing. Knowing your actual distances saves you from buying wrong accessories.
Best Cable Management Tools for Any Desk Setup
The right tools make the difference between a desk that looks clean and one that actually stays clean.
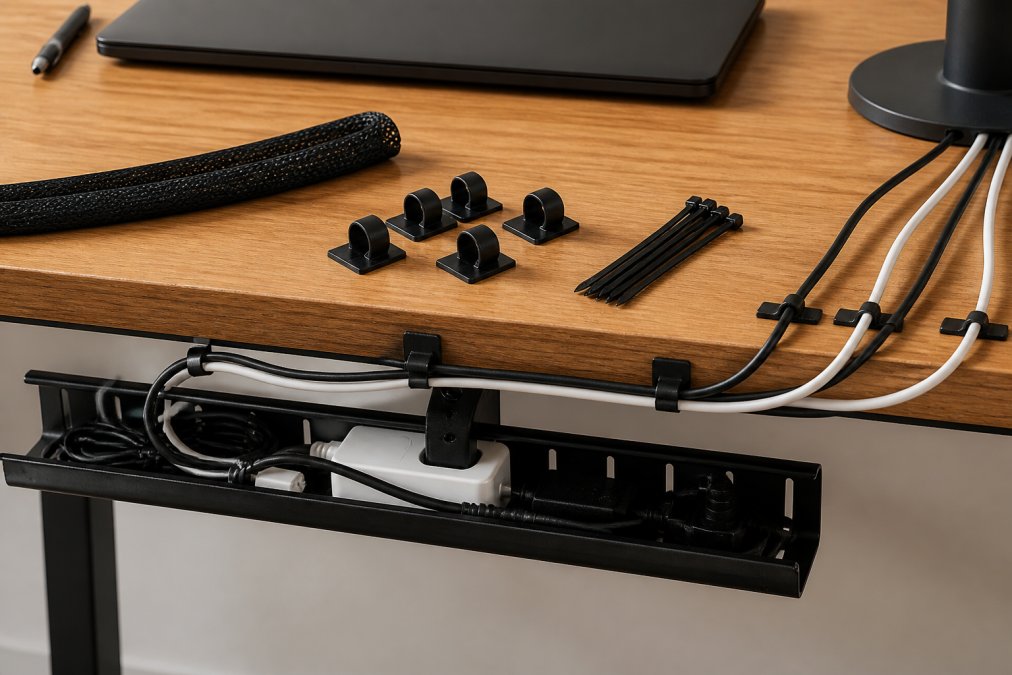
Under-Desk Trays and Cable Raceways
A cable tray is a mesh or solid basket that mounts underneath your desk to hold power strips, cable management boxes, and bundled cable runs. Most trays attach with screws or clamp onto the desk edge without drilling.
A cable raceway is a plastic channel that adheres or screws along walls and desk edges to conceal cable runs. According to OSHA guidelines on electrical safety in the workplace, exposed cables on floors and walkways are a genuine trip and safety hazard.
For most setups, a combination of an under-desk tray and a raceway handles the vast majority of cable clutter.
Cable Sleeves, Ties, and Adhesive Clips
Cable sleeves are flexible fabric tubes that bundle multiple cables into a single, clean run. Split-loom sleeves let you add or remove cables without fully disassembling the bundle.
Cable ties come in two types: single-use zip ties and reusable velcro straps. Use velcro for anything you might reroute later; zip ties work for permanent runs.
Adhesive cable clips stick to the underside or back edge of your desk and hold individual cables in a routed path.
Cable Management Boxes and Power Strip Covers
A cable management box is a covered container that hides a power strip and excess cable slack. It sits on the floor or mounts under the desk with openings for cables to enter and exit. This is particularly useful if you have wall warts or chunky adapters.
| Tool | Best For | Mounting Method |
|---|---|---|
| Cable tray | Hiding power strips and bulk cable | Screws or clamp |
| Cable raceway | Routing along walls and desk edges | Adhesive or screws |
| Cable sleeve | Bundling desk-to-floor cable drops | No mounting needed |
| Adhesive cable clips | Routing individual cables along surfaces | Adhesive |
| Cable management box | Concealing power strips and adapters | Floor or under-desk |
| Velcro cable ties | Bundling grouped cables | No mounting needed |
Step-by-Step: How to Organize Cables on Your Desk
Organizing cables is most effective when done in a specific sequence. Skipping steps is why most people re-do the job three months later.
Step 1: Audit and Unplug Everything
Unplug every cable from the desk. Lay them out and sort into three groups: cables you use daily, cables you use occasionally, and cables that are just there out of habit. Remove the cables you don't need. Fewer cables is always better than better-organized cables.
Step 2: Group Cables by Zone and Function
Divide your desk into functional areas: monitor zone, input device zone, audio zone, and charging zone. Each zone should have its own cable bundle rather than running all cables together in one mass.
Group cables by where they start and end, not just by type. A monitor cable and a webcam cable that both terminate near the top of your monitor are natural bundle partners even though they're different cable types.
Step 3: Route Cables Along Desk Edges
Keep cables out of your primary workspace by running them along the perimeter. Use adhesive cable clips spaced roughly 15 to 20 centimeters apart along the back edge of the desk to hold cables flat against the surface.
Route cables to the back corner nearest your power source, then drop them vertically down the desk leg. A cable sleeve on this vertical drop keeps the run clean. Avoid running cables across the desk surface horizontally.
Step 4: Mount Your Power Strip Under the Desk
Mounting your power strip under the desk is the single biggest visual improvement you can make. Most cable trays have a built-in bracket for this, or you can use a dedicated power strip mount with adhesive or screws.
Position the power strip so its cord reaches the wall outlet without being stretched tight. According to the U.S. Consumer Product Safety Commission's guidance on extension cord safety, power strips should never be daisy-chained together or plugged into extension cords.
Step 5: Label and Color-Code Your Cables
Labeling saves significant frustration every time you need to trace or swap a cable. Use colored electrical tape or small cable label tags at both ends of each cable. Assign a color or number to each device. Color-coding works well for multi-monitor setups where you have several identical-looking cables running to similar destinations.
How to Hide Power Strips for a Cleaner Desk
Three approaches work depending on your desk and floor situation.
Under-desk mounting is the cleanest option for most setups. A cable tray holds the power strip and keeps it invisible from normal viewing angles.
Cable management boxes work well when under-desk mounting isn't possible. The box sits on the floor beside or behind the desk and has cut-outs for cables to pass through.
Desk grommets and cable routing holes allow cables to pass through the surface cleanly. Route your power strip cable through the nearest grommet before it reaches the power strip location.
Pushing the power strip behind the desk against the wall doesn't work. The cables fan out in every direction and end up more visible than before.
Cable Management for Standing Desks
Standing desk cable management differs from fixed-desk management because cables need enough length to accommodate the full height range without going taut at the top or puddling on the floor at the bottom.
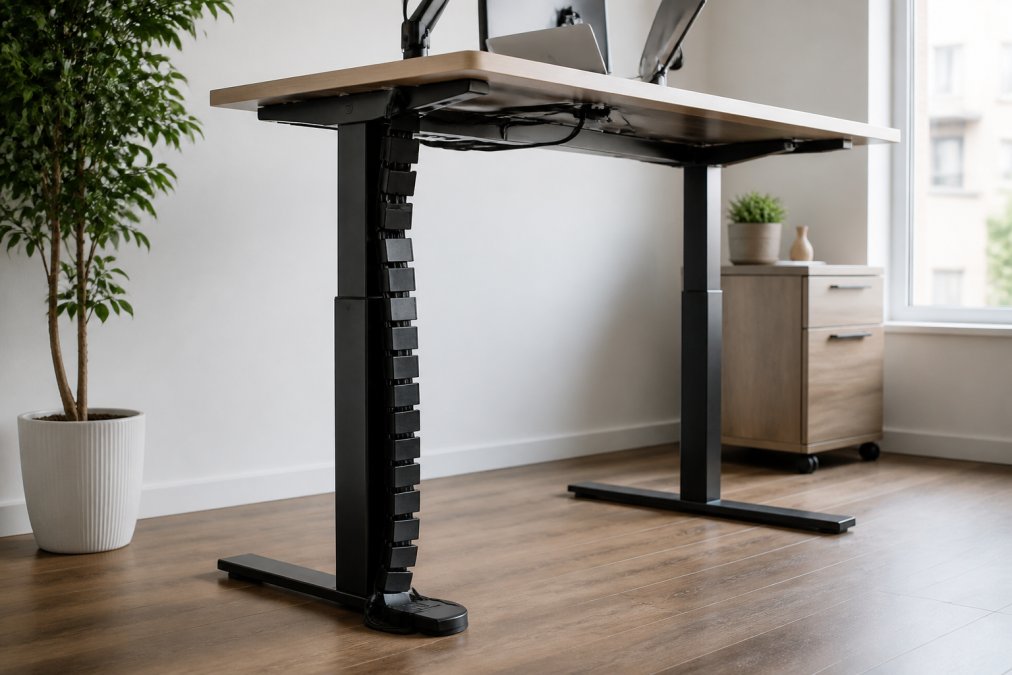
Managing Cable Slack During Height Adjustments
A cable spine or cable snake is the standard solution for standing desks. It's a flexible conduit that mounts to the desk leg and holds the cable bundle in a managed loop. As the desk rises, the spine extends; as it lowers, the spine compresses.
Calculate your desk's full height range and add at least 30 centimeters to your cable length to accommodate movement. Cables that are exactly long enough at standing height will be too short at some point in the adjustment range.
Multi-Monitor Setups and Standing Desks
Multi-monitor setups introduce more cables, and standing desk motion amplifies the management challenge. Treat each monitor's cable run as a separate bundle and route them together through a single cable spine.
For a dual-monitor setup, bundle each monitor's cables together with velcro ties before they enter the cable spine. If you ever need to disconnect one monitor, you're dealing with a clean sub-bundle rather than individual cables threaded through a shared sleeve.
Cable Management for Rental or Non-Permanent Desks
For rental apartments, shared offices, or temporary setups, adhesive-based cable management works without drilling holes. Clean the mounting surface with isopropyl alcohol before applying any adhesive mount.
These approaches work without permanent modification:
- Clamp-on cable trays attach to the desk edge with a screw clamp and remove cleanly
- Adhesive raceways peel off most surfaces without leaving marks
- Velcro cable ties require no mounting at all
- Freestanding cable management boxes sit on the floor and need no mounting
According to advice from the National Fire Protection Association on safe cord management, cables should never be run under rugs or carpets, especially in rental situations.
Cable Safety: Fire Prevention and Common Mistakes to Avoid
Cable safety deserves more attention than it typically receives. A poorly managed cable setup is not just an aesthetic problem.
The most common and dangerous mistakes:
Daisy-chaining power strips. Plugging one power strip into another multiplies the load beyond what it was rated for. This is a leading cause of electrical fires in home offices.
Covering cables with rugs or furniture. Covered cables can't dissipate heat properly. If a cable has insulation damage, covering it creates conditions for a fire.
Pinching cables in tight bends. Cables bent at sharp angles develop internal wire breaks over time, causing heat buildup at the break point.
Using the wrong cable for the load. Extension cords have amperage ratings. Running a high-draw device through a lightweight extension cord creates a fire risk.
Bundling power cables tightly with data cables. Power cables generate electromagnetic interference that degrades data cable performance. Keep them separated or cross them at right angles rather than running parallel.
A well-organized cable management system addresses all of these naturally. When cables are routed properly, mounted, and labeled, you can see the full run of every cable and spot problems before they become hazards.
A cluttered desk is harder to work at, and cable management is one of the few workspace upgrades that pays off immediately. If you're looking for gear that reduces cable count from the start, Jackie's Attic carries compact, foldable wireless charging solutions and multi-functional accessories designed to replace several single-purpose devices with one. Fewer devices mean fewer cables, which means less to manage. Browse the Jackie's Attic collection and find the accessories that simplify your setup.
Frequently Asked Questions
Q: What are the best tools for desk cable management?
A: The most practical tools include under-desk cable trays, adhesive cable clips, zip ties, cable sleeves, and cable raceways. A cable management box works well for hiding power strips and excess cord length. For a complete setup, pair a cable tray mounted under the desk with a cable spine along the desk leg. Most of these accessories are inexpensive and widely available, so you can build a full cable management system.
Q: How do I organize standing desk cables?
A: Standing desks need extra cable slack to handle height changes without pulling cords loose. Use a cable spine or retractable cable organizer attached to the desk leg to keep cables bundled as the desk moves. Route cables through the spine from the desktop down to the floor, and leave enough slack at the top so the bundle flexes freely. Avoid rigid cable raceways on the leg itself, as they can bind or snap when the desk adjusts.
Q: How do I hide a power strip under my desk?
A: Mount the power strip directly to the underside of the desk using the strip's built-in keyhole slots or a dedicated under-desk mounting bracket. Secure it with screws if the desk material allows, or use heavy-duty adhesive strips for rental-friendly setups. Once mounted, route cables up through a cable tray or along desk edges using adhesive clips. This removes the power strip from floor view and eliminates the tangled cord cluster that typically collects beneath a desk.
Q: How can I manage cables without drilling holes or damaging my desk?
A: Adhesive cable clips, removable adhesive strips, and clamp-on cable trays all attach without screws or drilling. Cable management boxes with adhesive feet sit on the floor or desk surface without permanent mounting. Velcro cable ties replace zip ties and are fully reusable. These no-damage options are especially useful in rental apartments or shared office spaces where you cannot modify furniture or walls.
This article was written using GrandRanker


