


Table of Contents
- Step 1: Clear the Trunk and Assess Your Space
- Step 2: How to Pack a Car for a Long Trip with the Right Gear
- Step 3: Best Car Trunk Organizers 2026 for Every Budget
- Step 4: Use Vertical Storage and Side Panels to Maximize Space
- Step 5: Balance Weight Distribution for Vehicle Safety
- Your Road Trip Packing Checklist for 2026
- Step 6: Secure Loose Items and Keep Emergency Gear Accessible
- Frequently Asked Questions
Last Updated: September 20, 2026
Step 1: Clear the Trunk and Assess Your Space
Learning how to organize car trunk space for road trips 2026 starts with an empty trunk, and the first move is to organize car trunk contents from scratch. Pull everything out, including the jack, jumper cables, and that mystery bag from last summer.
Next, note the fixed obstacles:
- Wheel wells that eat into floor space
- Sloped rear seats
- A spare tire well or subwoofer box
- Cargo tie-down anchors
Step 2: How to Pack a Car for a Long Trip with the Right Gear
Packing a car for a long trip works best when you group items by how often you'll touch them: daily items on top, emergency gear reachable, everything else filling the gaps.
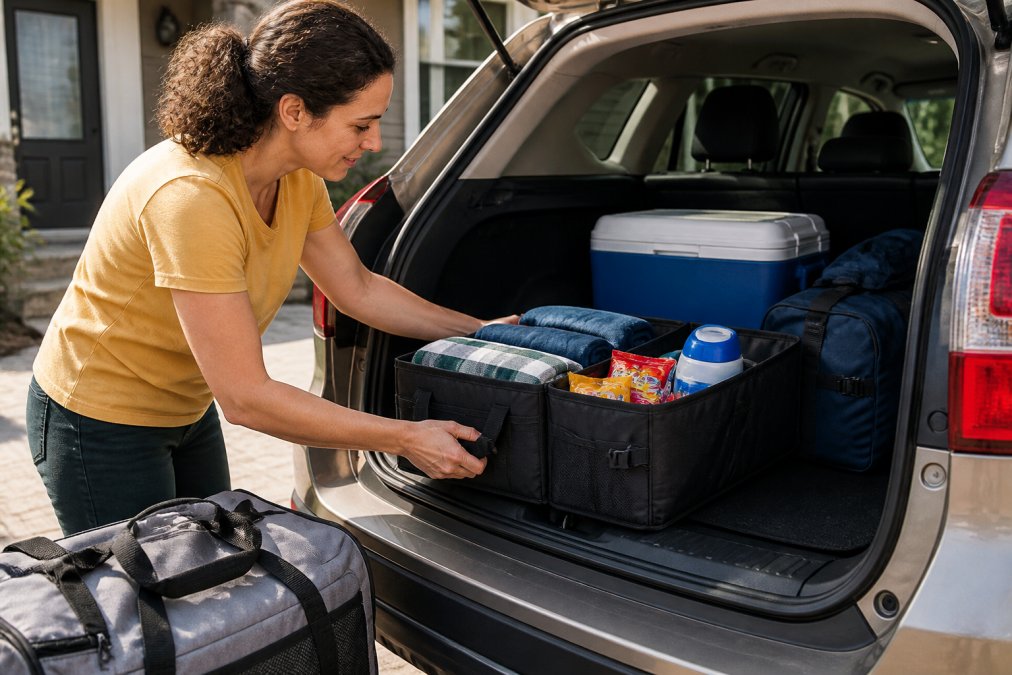
Soft-Sided vs. Rigid Trunk Organizers
Soft-edge organizers win for most road trips: they squeeze into odd shapes, collapse when empty, and cost less. Rigid-edge containers protect fragile gear and stack cleanly, but waste space around wheel wells.
Gear to Keep Within Reach
Reach matters as much as space. Keep these in the cabin or front of the trunk:
- Phone charger and cables
- Snacks and water
- Maps or a phone mount
- First aid kit
- A portable urinal for emergencies
A 750ml reusable urinal collapses to about 7 inches and fits in a door pocket, gear accessibility that saves a trip when rest stops are far apart.
Step 3: Best Car Trunk Organizers 2026 for Every Budget
The best car trunk organizers 2026 balance size, material, and how often you'll use them. Skip anything that doesn't match your measured space. A great organizer in the wrong size is just clutter.
Here's how the main types compare:
| Organizer Type | Best For | Space Use | Typical Durability |
|---|---|---|---|
| Soft-sided collapsible | Clothes, snacks, tote bags | Fits odd shapes | Moderate |
| Rigid-edge container | Tools, electronics, glass | Stacks, less flexible | High |
| Seat-back organizer | Small daily items | Uses cabin space | Moderate |
| Modular storage cubes | Mixed gear, camping | Reconfigures fast | Moderate to high |
Step 4: Use Vertical Storage and Side Panels to Maximize Space
Vertical storage turns dead air into usable room. Most trunks have 15 to 20 inches of height drivers never touch.
Try these moves:
- Stack soft duffels two high against the back seats
- Hang a visor organizer for documents and sunglasses
- Use side panel storage pockets for small tools and chargers
- Add hooks and hangers for bags and cables
Match the Vertical Strategy to Your Vehicle
Vertical storage is a set of techniques, and the right one depends on your cargo area:
- Sedans. The trunk lid limits stacking height, and the rear seat backs are usually the tallest flat surface. Lean soft duffels against the seat backs and keep the tallest items in the center so the lid closes without crushing them. A trunk lid organizer adds a flat layer for small tools and rain gear.
- SUVs and crossovers. You have the most vertical room and the most temptation to over-stack. Use it for light, bulky items like sleeping bags and pillows, and keep the top 6 inches clear so you can see out the rear window.
- Hatchbacks and wagons. The cargo floor is often at or above the rear axle, and the open cabin means anything unsecured can travel forward. A cargo net or rigid organizer acts as a bulkhead, and a seat-back organizer adds a second vertical surface.
- Minivans. The deep well behind the third row is the best vertical space in the vehicle. Use it for coolers and heavy gear, then stack soft bags on the folded third-row seats above.
Roof Racks and External Carriers for Overflow
When interior cargo runs out, roof racks and cross bars add space without touching passenger comfort. A trailer hitch cargo carrier works for coolers and camping gear. Both options change how your vehicle handles, so check your owner's manual for weight limits before loading up.
The trade-offs are real and worth naming:
2-in-1 Smart Car Cup Warmer/Cooler →
- Roof cargo raises your center of gravity. A rooftop box full of sleeping bags is light, but it still sits above the roofline and adds wind resistance. Expect a measurable drop in fuel economy on the highway, especially above 60 mph.
- Roof cargo adds wind noise. Cross bars alone whistle. A box or basket makes it worse. If you are not using the rack, take the cross bars off between trips.
- Hitch carriers change rear visibility and departure angle. A loaded hitch basket blocks the rear camera and can scrape on steep driveways. Check the tongue weight rating of your hitch, not just the rack's capacity.
- Roof load limits are separate from cargo limits. Most roof racks are rated for a fraction of what the trunk can hold, often 100 to 165 pounds depending on the vehicle. That number is in the owner's manual and on the rack itself.
- Everything on the roof must be strapped twice. One strap in each direction, plus a backup. Roof loads see highway wind loads that trunk loads never do.
A Note on Sustainable Storage
Most trunk organizers are plastic or synthetic fabric. For a lower-waste setup, look for canvas or recycled-fiber organizers, reusable mesh produce bags, and stainless or glass water bottles. These cost a little more up front and last for years, the same logic that makes a good trunk organizer worth buying.
Step 5: Balance Weight Distribution for Vehicle Safety
Load distribution is a safety issue, not a packing preference. Heavy items belong low and centered, over the rear axle, to keep your center of gravity stable and steering predictable. Most drivers get this wrong because they treat the trunk as one big box instead of thinking about where the mass sits relative to the axles.
Why the Physics Matter More Than the Packing Tip
Every vehicle has a gross vehicle weight rating (GVWR) and a separate maximum cargo weight, both on the driver's door jamb sticker and in the owner's manual. That cargo number already subtracts a full tank of fuel and a 150-pound driver, so passengers and bags come out of the same budget. A family of four at roughly 150 pounds each plus 200 pounds of luggage can eat most of a compact SUV's payload before a single cooler goes in.
- Braking distance grows. More mass means more momentum, and the brakes have to shed all of it. A rear-heavy load also shifts weight off the front tires, which are doing most of the stopping.
- Steering gets vague. Weight over the rear axle lifts the front end slightly, reducing grip on the tires that turn the car.
- Body roll increases in evasive maneuvers. A high, off-center load raises the center of gravity and makes a quick lane change feel like a lean.
Load the Trunk in Layers, Not Piles
Think of the trunk as three horizontal bands:
- Floor band (heaviest). Coolers, tool bags, water jugs, cast-iron cookware, anything dense. These sit directly on the trunk floor, centered left-to-right, and as close to the rear axle as the wheel wells allow.
- Middle band (medium). Duffels of clothes, camp chairs, sleeping bags. These fill the gaps around the heavy items so nothing can slide.
- Top band (lightest). Pillows, jackets, paper towels, snacks. Nothing here should be able to hurt anyone if it moves.
Keep the load balanced side to side. A 50-pound cooler on the left and 50 pounds of gear on the right handles far better than 100 pounds on one side, even though the total is identical.
Vehicle-Specific Starting Points
Exact numbers live in your owner's manual, but the shapes of the problem differ by body style:
- Sedans. The trunk is a closed box behind the rear seats, so weight sits behind the axle and levers the front end up. Keep the heaviest items as far forward as possible, against the seat backs.
- SUVs and crossovers. The cargo area is tall, which tempts vertical stacking. Resist it above the seat-back line. The taller the stack, the higher the center of gravity.
- Hatchbacks and wagons. The cargo floor is often at or above the rear axle, and the open cabin means anything unsecured can travel forward. Use a cargo net or a rigid organizer as a bulkhead.
- Pickups with a bed. Bed weight sits behind the rear axle and unloads the front tires. Keep a heavy load over or slightly ahead of the axle, not against the tailgate.
Secure Everything, Then Check It Again
The NHTSA guidance on cargo and load safety notes that unsecured items can become dangerous projectiles in a sudden stop. A cooler that slides forward at highway speed can injure anyone in the back seat. A 40-pound cooler at 60 mph carries the same kinetic energy as a small motorcycle at walking pace, and it will not stop when you do.
Your Road Trip Packing Checklist for 2026
A road trip packing checklist keeps you from forgetting the items you'll actually need. Run through it the night before you leave.
- Trunk measured and organizers sized to fit
- Heavy items loaded low and centered
- Emergency kit within reach, not buried
- Portable urinal packed for long stretches
- First aid kit accessible from the cabin
- Phone chargers and cables in the front
- Snacks and water in a tote bag up top
- Bungee cords and straps for loose items
- Roof rack or hitch carrier weight checked
Step 6: Secure Loose Items and Keep Emergency Gear Accessible
Bungee cords and straps stop loose items from sliding. Run a cord across stacked bags or a cargo net over the trunk floor, and keep small items together in tote bags.
Emergency gear needs its own spot near the trunk opening. Pack a dedicated emergency kit with:
- Jumper cables
- Flashlight and spare batteries
- Basic tools
- Blanket
- Reflective triangles or flares
Frequently Asked Questions
What is the best way to organize my car for a road trip?
Start by emptying the trunk completely and grouping items by how often you'll need them. Put emergency gear and a portable urinal near the tailgate, and pack daily-use items in a soft-sided organizer within arm's reach. Use vertical space with stacked bins, and secure everything with bungee cords so nothing shifts while driving. A 2-in-1 smart car cup warmer/cooler keeps drinks at the right temperature without taking up cupholder space you need for navigation.
What are some good ideas for organizing my car trunk?
Use a mix of soft-edge organizers for flexible items and rigid-edge containers for fragile gear. Add side panel storage pockets for small tools, hooks and hangers for bags, and a visor organizer for documents. Categorize by frequency of use: emergency kit and spare fluids at the bottom, camping gear in the middle, and snacks or chargers on top. A 450ml smart digital thermal bottle fits neatly in a side pocket and keeps drinks cold for hours.
How do you maximize trunk space for long road trips?
Maximize space by packing vertically, using every inch from floor to parcel shelf. Remove unused items like jumper cables you won't need, and switch to modular storage totes that stack. If your trunk still overflows, add roof racks or a trailer hitch cargo carrier. Keep weight limits in mind: most roof racks cap at 100-165 pounds, so put heavy gear in the trunk and light items up top. A portable urinal saves space by replacing bulky emergency bathroom stops.
What items should be kept in a car trunk for emergencies?
Keep a basic emergency kit with a first-aid pouch, flashlight, jumper cables, tire pressure gauge, and a portable urinal for traffic jams or remote stops. Add a thermal bottle for water, a small toolkit, and reflective triangles. Store these in a rigid-edge container so they don't crush. Check your kit before every trip and replace expired items. For multi-week travel, add a portable 2-seat folding chair with umbrella for rest stops.


