


Table of Contents
- Why Your Bathroom Faucet Splashes: A Step-by-Step Diagnosis
- How to Reduce Faucet Water Pressure Without Replacing the Faucet
- Bathroom Faucet Aerator Cleaning: A Safe Step-by-Step Guide
- When the Faucet Stream Is Hitting the Sink Basin Wrong
- Faucet Spraying Water Sideways? Fix the Handle and Aerator
- When to Call a Plumber: Plumbing Faults vs. Faucet Design
- Frequently Asked Questions
Last Updated: October 5, 2026
Why Your Bathroom Faucet Splashes: A Step-by-Step Diagnosis
A splashing bathroom faucet is almost always caused by one of three things: water pressure that's too high, a clogged or missing aerator, or a spout that sits too high above the sink. This guide walks you through how to fix splashing bathroom faucet problems in the order that solves them fastest, starting with the simplest checks.
Most people blame the faucet itself. In practice, the aerator and the spout-to-sink gap cause more splashing than the fixture ever does. Below, we'll show you exactly how to tell these three problems apart in about ten minutes, using nothing but your hands, a wrench, and a ruler.
Here's the order that saves the most time:
- Check water pressure and flow rate first
- Inspect and clean the aerator second
- Measure spout height, reach, and sink depth last
Step 1: Check the Water Pressure and Flow Rate
Start by turning the faucet handle to about half open. If the water stream hits the basin and bounces back up at you, high flow is your likely culprit. A gentle, steady stream that still splashes points somewhere else.
Water pressure and flow rate are not the same thing. Pressure is the force pushing water through the pipe; flow rate is how much water comes out per minute. A bathroom faucet that runs wide open sends a fast, narrow stream straight into the basin, and that impact is what throws water onto the counter.
Try this quick test:
- Open the faucet fully and watch where the stream lands
- Slowly close the handle to about half
- If splashing drops sharply, your issue is flow, not the fixture
If your whole house has high pressure, a pressure-reducing valve on the main line is the real fix. That's a job for a plumber, not a faucet swap.
Step 2: Inspect the Aerator
The aerator is the small screened cap at the tip of the faucet outlet. It mixes air into the water stream, which softens the flow and cuts splashing. When it clogs with mineral buildup, the stream turns erratic and sprays sideways.
Unscrew the aerator by hand or with a small wrench. Look at the screen and the tiny holes inside. If you see white crust or dark specks, that's your problem. A clogged aerator is the single most common cause of a faucet spraying water in odd directions.
We cover the full cleaning process in the aerator section below. For now, just note whether the screen looks clear or blocked.
Step 3: Measure Spout Height, Reach, and Sink Depth
If pressure and the aerator both check out, the problem is geometry. A faucet spout that sits too far above a shallow sink will splash no matter how gentle the stream is.
Grab a ruler and measure three things:
- Spout height: the distance from the sink surface up to the faucet outlet
- Spout reach: the horizontal distance from the faucet base to the center of the sink
- Sink depth: the distance from the rim down to the drain
Write these down. If the spout height is more than about 6 inches above a sink that's only 4 inches deep, the water has too much room to pick up speed before it lands. That gap is a design mismatch, not a defect.
How to Reduce Faucet Water Pressure Without Replacing the Faucet
You can reduce faucet water pressure without replacing anything by partially closing the shut-off valve under the sink. This is the fastest fix, and it takes about two minutes.
Here's how:
- Open the cabinet under the sink and find the two shut-off valves
- Turn the hot and cold valves clockwise about a quarter turn
- Open the faucet and check the stream
- Adjust in small steps until splashing stops
Don't crank the valves shut. You want a steady, calm flow, not a trickle. If the valves are old and stiff, stop before you force them, since a broken valve means a bigger repair.
A second option is swapping the aerator for a lower-flow model. Most standard aerators are rated by flow, and a lower rating softens the stream at the source.
If neither works, the pressure at the main line is the real issue. That's when you call a plumber.
Bathroom Faucet Aerator Cleaning: A Safe Step-by-Step Guide
Bathroom faucet aerator cleaning takes about 15 minutes and needs only white vinegar, a small brush, and a towel. Cleaning the aerator restores an even stream and stops most sideways spraying.
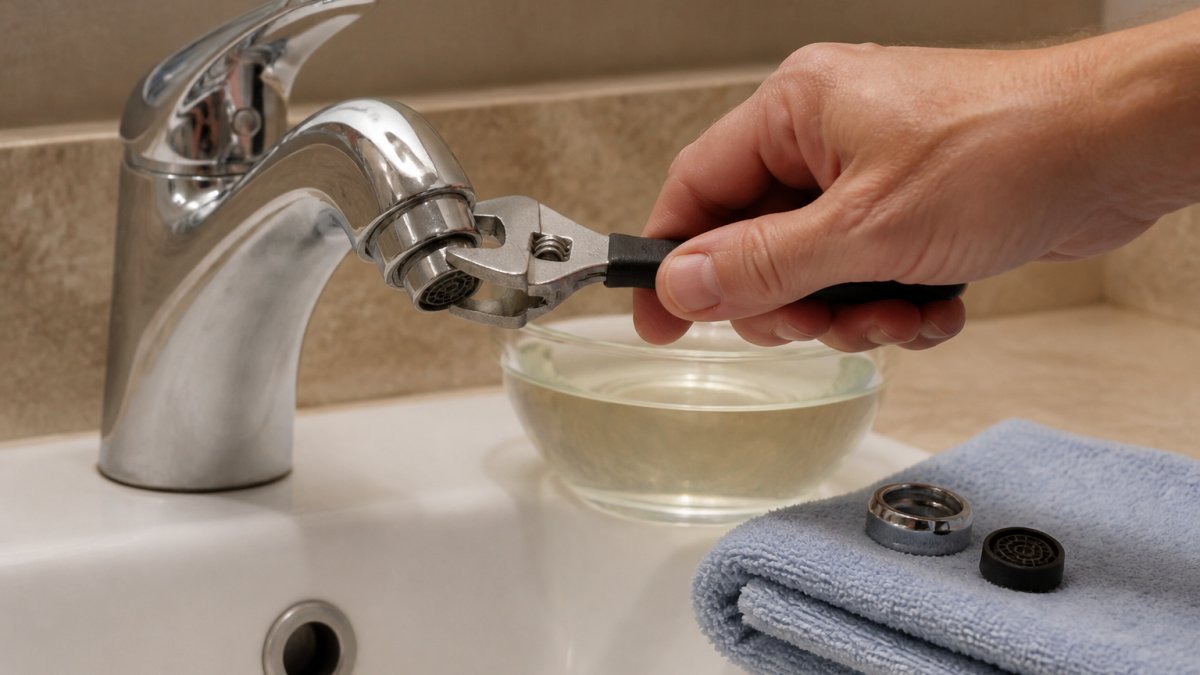
Mineral buildup is the enemy here. Hard water leaves calcium and lime deposits inside the aerator's screen and holes, and those deposits split the stream into unsteady jets. A vinegar soak dissolves them without harsh chemicals.
Follow these steps:
- Close the drain plug so small parts can't escape
- Unscrew the aerator counterclockwise by hand, or use a wrench wrapped in tape to protect the finish
- Take apart the pieces: outer housing, screen, and any rubber washers
- Soak the metal and screen parts in white vinegar for 30 to 60 minutes
- Scrub the screen gently with an old toothbrush
- Rinse everything under running water
- Reassemble in the reverse order and screw the aerator back on
Turn the faucet on slowly and check the stream. It should look even and calm, not jagged.
Removing and Replacing a Clogged Aerator
Sometimes cleaning isn't enough. If the screen is torn, the housing is cracked, or the threads are stripped, replace the aerator instead. Match the thread size and flow rating to your old one, and bring the old aerator to the store if you're unsure.
To remove a stuck aerator, wrap the jaws of your wrench in masking tape first. Grip gently and turn counterclockwise. If it won't budge, a few drops of penetrating oil around the threads, left for ten minutes, usually loosens it. Never force it, since a cracked faucet outlet is a much bigger repair than a new aerator.
When the Faucet Stream Is Hitting the Sink Basin Wrong
A faucet stream that lands off-center or bounces out of the basin is a placement problem, not a pressure problem. The fix is to redirect where the water hits, not to slow it down.
Watch the stream for a few seconds. Does it land near the drain, or off to one side? Does it hit the slope of the basin and shoot sideways? If the stream lands on the curved side of the sink instead of the flat bottom, water will ride that curve right onto your counter.
A few things cause this:
- The spout reach is too short, so water lands near the back of the basin
- The spout is angled slightly off, so the stream drifts to one side
- The sink surface has a steep slope near the drain
Adjusting Spout Reach and Stream Landing Position
First, check whether your faucet has an adjustable spout or a swivel head. Many bathroom faucets let you rotate the outlet a few degrees, which is often enough to move the stream landing position toward the center of the sink.
If the spout isn't adjustable, an aerator with a wider spray pattern can spread the stream so it lands softer and more centered. This is the practical fix when the faucet design and sink compatibility just don't match.
For a deep sink paired with a low spout, the stream has a short drop and lands softly, which is ideal. For a shallow sink paired with a tall spout, you'll fight splashing forever unless you slow the flow or widen the spray.
Faucet Spraying Water Sideways? Fix the Handle and Aerator
A faucet spraying water sideways is usually a partially clogged aerator or a handle that's opening too far. Both are quick fixes.
Try the handle first. Open it slowly and stop as soon as you have enough flow. Many faucets have a sweet spot where the stream is full but calm. Cranking the handle wide open is what turns a good stream into a messy one.
If the handle feels loose or the flow changes on its own, the cartridge inside may be worn. A worn cartridge can send uneven flow to the outlet, which shows up as erratic spraying. Replacing a cartridge is a moderate DIY job, and the part is specific to your faucet model.
Here's how to check the handle:
- Open the faucet slowly and note where splashing starts
- If splashing only happens past a certain point, the handle range is your issue
- If it splashes at every setting, go back to the aerator
When to Call a Plumber: Plumbing Faults vs. Faucet Design
Call a plumber when the splashing comes with other symptoms: water hammer, dripping under the sink, low pressure at every fixture, or a shut-off valve that won't turn. Those point to a plumbing fault, not a faucet design issue.
A few clear signals it's time to stop DIY:
- Pressure is high throughout the house, not just at one faucet
- You hear banging or knocking in the pipes when you turn water on
- The shut-off valve under the sink is stuck or leaking
- Water pools under the cabinet after use
If your splashing is isolated to one bathroom faucet and the rest of the house is fine, it's almost certainly the aerator or the spout-to-sink gap. Fix those first.
Plenty of homeowners assume a splashing sink means a full replacement. It rarely does. A vinegar soak and a quarter turn on a valve fix the majority of cases.
Frequently Asked Questions
Why is my bathroom faucet splashing excessively?
Excessive splashing usually comes from three things: water pressure that is too high, a clogged or worn aerator, or a spout that sits too high above a shallow sink. Start by testing the flow with the handle half-open. If the splash stops, pressure is the issue. If the stream looks uneven or sprays sideways, the aerator needs cleaning. If the water lands off-center even at low flow, the faucet-to-basin geometry is the cause.
How do I clean a faucet aerator that is causing splashing?
Unscrew the aerator from the faucet outlet by hand or with a small wrench. Take out the screen and any rubber gaskets, then soak them in white vinegar for 30 to 60 minutes to break down mineral buildup. Rinse with warm water, scrub gently with an old toothbrush, and reassemble. If the stream still splashes after cleaning, replace the aerator with a new one matched to your faucet brand and model.
Can water pressure make a bathroom faucet splash?
Yes. High water pressure forces the stream out faster than the aerator can soften it, so the water hits the sink surface hard and splashes back. You can reduce faucet water pressure by opening the handle gradually instead of all the way, or by installing a low-flow aerator rated for lower gallons per minute. If pressure is high throughout the house, a plumber can check your pressure regulator.
When should I replace a splashing bathroom faucet?
Replace the faucet when the spout is too short or too high for your sink and no aerator change fixes the splash, when the handle no longer adjusts flow smoothly, or when the body leaks around the base. If you have already cleaned or replaced the aerator and adjusted pressure with no improvement, a new faucet with a spout height and reach matched to your basin is the practical next step.
A splashing bathroom faucet is usually a small problem dressed up as a big one. Before you shop for a new fixture, clean the aerator, ease off the handle, and check the spout-to-sink gap. If you're upgrading your bathroom routine while you're at it, Jackie's Attic carries practical home accessories and lifestyle gadgets built to simplify daily tasks, from versatile charging stations to smart home tools. Browse the collection and find something that earns its spot on your counter.


